长期以来 DockerHub 域名被污染限速,所以博主一直在使用国内的镜像,但自从2024年5月末开始,国内所有 Docker 镜像服务均被迫下架,涵盖了阿里云镜像服务、上海交通大学镜像服务等,没办法了,只能建立自己的镜像使用了。
创建自己的镜像
- 登录到CF的仪表盘 https://dash.cloudflare.com/
- 点击 workers-and-pages > 创建应用程序 > 创建 Worker > 点击保存 >点击完成 > 编辑代码
填入下面的代码
const HTML = ` <!DOCTYPE html> <html lang="zh-CN"> <head> <meta charset="UTF-8"> <meta name="viewport" content="width=device-width, initial-scale=1.0"> <title>Dockerhub镜像加速说明</title> <style> body { font-family: -apple-system, BlinkMacSystemFont, "Segoe UI", Roboto, "Helvetica Neue", Arial, sans-serif; line-height: 1.6; color: #333; margin: 0; padding: 20px; background-image: url('https://cdn.jsdelivr.net/gh/fireinrain/picx-images-hosting@master/20240608/wp8114669-docker-wallpapers.5h6dvj56isg0.webp'); /* Replace with your image path */ background-size: cover; background-position: center; background-repeat: no-repeat; background-attachment: fixed; } .container { max-width: 800px; margin: 0 auto; padding: 20px; background: rgba(255, 255, 255, 0.8); border-radius: 8px; box-shadow: 0 2px 4px rgba(0, 0, 0, 0.1); } h1 { font-size: 2em; margin-bottom: 0.5em; color: #007aff; } p { margin-bottom: 1em; } pre { background: #2d2d2d; color: #f8f8f2; padding: 20px; border-radius: 8px; overflow-x: auto; position: relative; } pre::before { content: " "; display: block; position: absolute; top: 10px; left: 10px; width: 12px; height: 12px; background: #ff5f56; border-radius: 50%; box-shadow: 20px 0 0 #ffbd2e, 40px 0 0 #27c93f; } code { font-family: "SFMono-Regular", Consolas, "Liberation Mono", Menlo, Courier, monospace; font-size: 0.875em; } .copy-button { position: absolute; top: 10px; right: 10px; background: #007aff; color: white; border: none; padding: 5px 10px; border-radius: 5px; cursor: pointer; opacity: 0; transition: opacity 0.3s; } pre:hover .copy-button { opacity: 1; } </style> </head> <body> <div class="container"> <center><h1>镜像加速说明</h1></center> <h3>为了加速镜像拉取,你可以使用以下命令设置 registry mirror:</h3> <pre><code> sudo tee /etc/docker/daemon.json <<EOF { "registry-mirrors": ["https://docker.yourdomain.workers.dev"] } EOF</code><button class="copy-button" onclick="copyCode(this)">复制代码</button></pre> <h3>用法:</h3> <p>原拉取镜像命令</p> <pre><code> docker pull library/alpine:latest</code><button class="copy-button" onclick="copyCode(this)">复制代码</button></pre> <h3>加速拉取镜像命令</h3> <pre><code> docker pull 你的域名/library/alpine:latest</code><button class="copy-button" onclick="copyCode(this)">复制代码</button></pre> </div> <script> function copyCode(button) { const code = button.previousSibling; const textArea = document.createElement('textarea'); textArea.value = code.textContent; document.body.appendChild(textArea); textArea.select(); document.execCommand('copy'); document.body.removeChild(textArea); button.textContent = '已复制'; setTimeout(() => { button.textContent = '复制代码'; }, 2000); } </script> </body> </html> `; async function handleRequest(request) { const url = new URL(request.url); // Redirect to HTTPS if the request is not secure if (url.protocol !== "https:") { url.protocol = "https:"; return Response.redirect(url.toString(), 301); } const path = url.pathname; const originalHost = request.headers.get("host"); const registryHost = "registry-1.docker.io"; if (path.startsWith("/v2/")) { const headers = new Headers(request.headers); headers.set("host", registryHost); const registryUrl = `https://${registryHost}${path}`; const registryRequest = new Request(registryUrl, { method: request.method, headers: headers, body: request.body, redirect: "follow", }); const registryResponse = await fetch(registryRequest); const responseHeaders = new Headers(registryResponse.headers); responseHeaders.set("access-control-allow-origin", originalHost); responseHeaders.set("access-control-allow-headers", "Authorization"); return new Response(registryResponse.body, { status: registryResponse.status, statusText: registryResponse.statusText, headers: responseHeaders, }); } else { // Replace docker.yourdomain.workers.dev with the current visiting domain const replacedHTML = HTML.replaceAll('docker.yourdomain.workers.dev', originalHost); // Remove background-image from btn-copy buttons const modifiedHTML = replacedHTML.replace(/background-image:\s*url\(.*?\)/g, ''); return new Response(modifiedHTML, { status: 200, headers: { "content-type": "text/html" } }); } } addEventListener("fetch", event => { event.respondWith(handleRequest(event.request)); });- 然后点右上角蓝色按钮 Deploy(以后可能会变成其他地方或者颜色)部署即可。
现在就可以测试使用了。
docker pull docker.yourdomain.workers.dev/library/nginx
使用自己的域名以便国内访问。
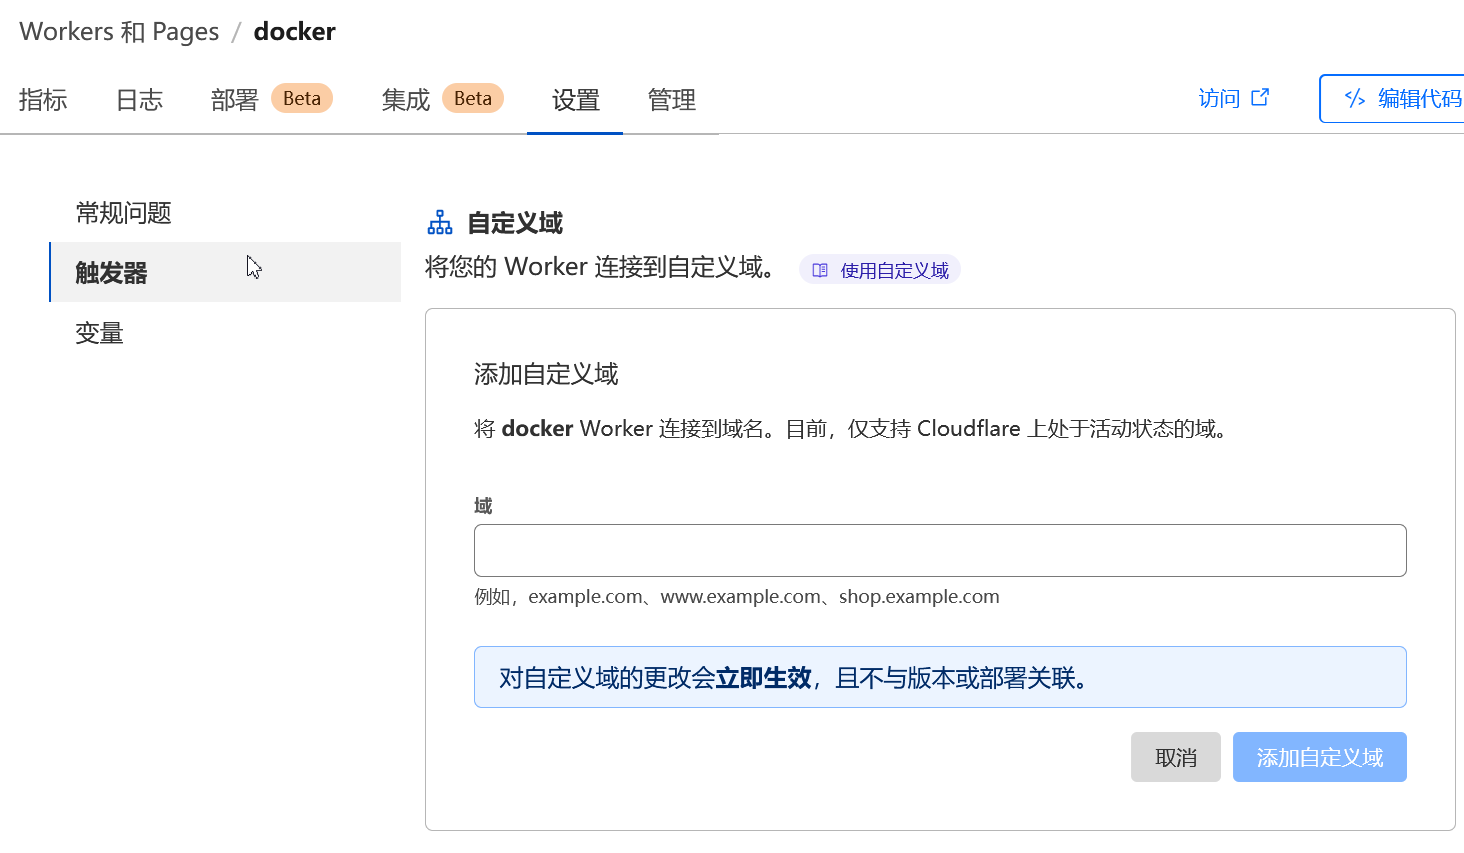
- 因为 Workers 默认域名被污染了,国内无法使用,所以还得使用自己的域名,建议去搞数字.xyz,10年才几十块
- 然后就是绑定域名到 Cloudflare ,这不是本文重点。
- 接着是新增路由。
Workers添加自定义域名
验证
docker pull yourdomain/library/nginx


这个docker稳定么 CF的确是大善人
没必要用这个了,有新的镜像了